Tuesday, December 24, 2013

Tis the season to get crafty, tra la la la la....

Thanksgiving is my favorite time of the year... but Christmas is a close second.  I really like giving people gifts and since I've become crafty I've enjoyed making things for people.  I started making the knit items almost a year in advance as I originally wanted to knit all my friends a scarf.

See? Beautiful green one sided and pink on the other scarf! Way too time consuming.

I eventually scraped that idea as it was too slow, boring, etc.  Eventually, it morphed into making toys that reminded me of certain friends.

I pulled out an older pattern to make for some friends.

As Christmas drew closer, and I ran out of time, I postponed giving people things until their birthdays, etc.  Lazy... I know.

First up - a couple friends of ours thoroughly enjoys Mario Bros and requested I crochet them a Goomba.  However, when they originally asked I didn't know how to crochet but since I acquired a while crochet hook kit back in September I've learned... and surprised them with one.  Again, I found a free pattern on Ravelry.com.  I had to look up a YouTube video on what a Magic Ring was, but that was worth it as it's a really cool skill for crochet.


When making the pattern, I ran into a little problem... I lost count when crocheting one of the feet. So he's a little... lopsided. But it still looks OK (I think) and I did better on the next ones.

Next ones you say? Well, after I made him I realized that some of our other friends would like them too.. so I made a mini army of Goombas...

AAAAHHH RUN AWAAAAAAAY!! I crocheted Domino an army!

Well, the Goombas weren't enough. I asked the hubby what other friends would like a crocheted gift and he asked if there was another Super Mario Bros pattern I could do.  Luckily, Ravelry is FULL of free patterns and I found the 1-Up Mushrooms... which I promptly made several for friends (and us).


They're super cute and easy to make. My phone camera turns the green a funny color.

So I made another one. I still need to work on my crochet skills... all my projects come out different sizes, ugh.

I didn't just crochet two mushrooms... I ended up making about seven of them - either red or green depending on the friend.  Carpal tunnel, anyone?

And once I was SICK of making mushrooms, I moved on to different friend... the one who likes penguins.  For some reason, I couldn't find a decent free pattern for knitting but I did find one in crochet. There were a couple techniques that I used on the star post but were rusty for those one, so YouTube helped with those but overall this was a taxing pattern.  I made some alterations (ex: didn't do the legs portion and didn't make 4 feet as two looked great on the bottom) and then the white part slip was weird.  It worked... but I stitched it on wrong and lost count at one part so it's... off. And I hate googley eyes on crocheted/knit toys so I just did black yarn.

I liked him even with all my changes. But I felt he was missing something...

....So I decided to crochet him a Santa Hat.  I didn't use a pattern for that - getting better!

But enough toys! Remember the Moebius Scarf I made? Well, I made another one for someone else for Christmas and then I made a tiny one for my bro in law since he likes math (I didn't think he'd wear a scarf). It's just small enough to be a desk ornament.

I tried to use the colors of the school. See how tiny it is? It was really hard to do on Size 3 circular needles with only 10in cables. Talk about painful.

But I think it looks pretty cool for a little desk topper. 

I didn't do a lot of sewing this year and I regret that.  Maybe I'll make a table runner next year for friends/family.  Or I'll do something with clay... or Baileys. Oh the choices!

Happy Holidays! I hope you enjoyed my review of patterns =)

Monday, November 11, 2013

Key Covers

As some of you may know, I recently changed jobs (YAY!).  Aside from being much happier, I have had a little bit of frustration... mostly dealing with the amount of keys I received.  They all look the same and I keep mixing them up when I need to use them. So I found this really cool fish key cover crochet pattern on Pinterest, but it was only a picture and not a pattern (hate that!!).  I did a Ravelry search and came across a few that worked and decided on this one.  I  purposely picked crochet as I need to work on those skills for other projects in the upcoming months I wish to do... =)

For a good video invisible decrease go here...

Here's the finished products!

Maybe I'll eventually figure out how to make it look like a fish. But I'm happy in the meantime.

Thoughts?

Friday, November 8, 2013

Guthrie Wall Hanging

For my Dad's birthday I wanted to do something really cool.  I kept coming back to my maiden name and the family crest idea.  Then I came across this cool tutorial for awesome borders... plus I just figured out how to do applique properly with my Bouncing Baby Boy project and the awesome tutorial I used. ANNNND... paper piecing has gotten easier! Hooray skills coming together. =)

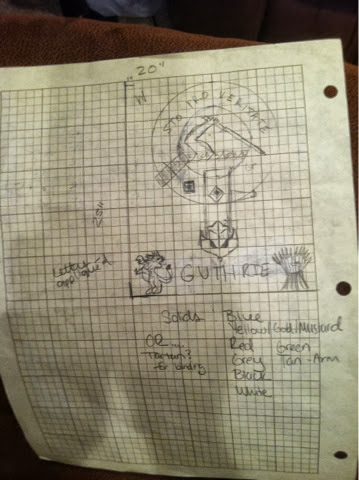
I had to sketch it out first to figure out the size and colors as well as where and what to put everything.

This was used as a rough outline in the end.

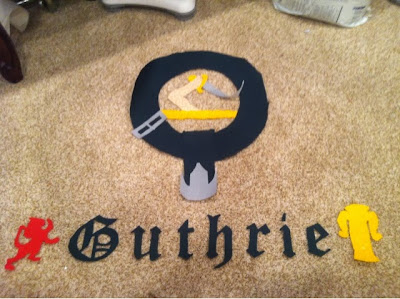
Letters that I had to trace on backwards... not fun in this font.

Once I started doing the cut outs of the letters, etc., to applique I realized the original orientation wouldn't work.  Lucky for me, one of the scrap fabrics from the discount bin was the PERFECT size!

I was rather proud at this point... but this is only 1/3 of the way done for the project.

Then I appliued everything on.  The 'G' and the Lion were really hard but I like how they came out.

His tongue looks so cool.  

The circle isn't so... Circular... but I like how it came out. I used red letters for the latin phrase "Sto Pro Veritate" which means I stand for truth. 


The three tartan colors are primarily green with lines of red and blue, so the red latin phrase is outlined in blue thread. Also, the letters that small were hard to embroider. 


I had fun with this one. 

Finally... the hard part... I tried actually quilting some fancy swirls on the corners.  It's hard to see here, because it's wet from be scrubbing off the blue ink, but I used this image from Google.  It's the one that looks like a corner.

This is my first time doing machine quilting. I'm rather proud of how easy it was and how well it came out all things considered.

This side looks a little better... not as wet.

I've used this pre-set border before but I really like it. Although, I should have used one less time/thread consuming...


Finished product. Can't wait to give it to him in a couple weeks!

Thoughts? Suggestions?

Sunday, October 20, 2013

Bouncing Baby Boy

Tis the season to have babies, tra la la, la la, la la la la....

But seriously, I'm at the stage of life where all my friends are either getting hitched, making babies, or both. Which is great for them! So to celebrate, I decided to make some baby blankets.

I didn't want to do anything too complex because, after some research, apparently baby blankets aren't but are typically cutesy and cuddly.  Hancock had a sale on fleece, which isn't unusual, so I got enough for four blankets, two of baby blue and two of baby pink.  

I wanted to use a new appliaque process that I saw on Pinterest with circles.  After stewing in my creative juices for a couple months, I used the circles and combined the common phrase "Bouncing baby boy" on the blankets.  

It took a while to make these things... mostly the layout of them as well as cutting all the letters and circles out.

So. Many. Circles. And the batting can be seen here... but not the actual letters which were hiding on another shelf.

See all those letters? Yeah, the original plan I had for ALL those letters I cut out didn't work. ARGGHH. Frustrated that I wasted so much time and materials I walked away from this project for about a month and a half. Eventually, after nursing my crafting pride back to health, I decided to use this tutorial on appliqué to finish at least one for a friend's baby shower.


However, I scrapped the original "bouncing baby" idea because I was running short on time and went for his name instead.  Ended up cutting off some of the white space too. 


Appliquéing all those circles and letters on there took forever.  It's not a small baby blanket... it'll fit the baby until it's a toddler. (Again, it's lying on our pool table... AKA the Quilted items presentation table).  And I used batting so it's super warm.


The Momma's theme was Monsters, Inc so the Monsters U fleece I found was PERFECT.  I also used extra to make it lap over as binding too. 

Of course, it calls for Steam a Seam, which both Joann and Hancock Fabrics didn't in store.  I could only find it online at Wal-Mart or on Amazon.  Annoying. I didn't want to wait! I wanted to do it ... NOW. Figure it out, NOW. Sigh.  I really hate waiting for things.  So instead I found something that does the same thing (and was just as easy and cost much less). 

But I didn't stop there. I also decided to knit some baby booties. 


This isn't the finished product, but they are rather cute. 


These are the finished product... ta-da!


I made two sets for two different little boys. Super easy to knit and it's a free pattern from Bernat... not selling those though. Just for friends!

Thoughts?

Thursday, October 10, 2013

Moebius Scarf

It's been a while and I blame several things for that. In the summer I tend to be very busy thanks to work and then I went on several vacations =) It was wonderful. However, now that Fall is here I am going to be crafting up a storm for everyone's Christmas gifts.

While on one of them, I learned how to knit a moebius scarf! FYI... a Moebius scarf ends up being half purled and half knit when looking at the finished product.  The twisted cable within while you're knitting every stitch is how this happens.  It's pretty awesome I think.  I had originally looked at the idea of it from this blog post (which explains what it is in great, math-related detail) as well as several Ravelry patterns, but seeing it done made me want to do it immediately.  As soon as I got home I went out and got the correct set of circular needles and started at it.

The top is stockingette stitch and the bottom half is garter stitch.  Such a cool pattern.

For those of you interested in doing it this YouTube video is the exact method I learned.  The circular needles that are used in the video can be found at KnitPicks.  I bought a pair of metal ones from Michaels which work fine, but if you're serious about circular knitting I would go with the KnitPicks one.  The cables are easier to manuver.

See how it knits and spirals? So cool.

But once you've cast on and gotten through the first two rounds, which are super weird, you just keep knitting until you like the length! It's super easy and comes out looking really cool.  Hooray!

Domino, as always, isn't impressed with it. But I am! =)

It lays nicely. Smaller than I thought it would be. Hmm... 

It's smaller than I thought it would be. I think it's because I cast on 100 stitches... maybe I'll do 130 next time.

Thoughts? I might make two! Hooray Christmas gifts!

Tuesday, September 24, 2013

Hookers Unite!

For my birthday, a good friend of mine bought me a complete set of crochet hooks and his lovely girlfriend (who crochets) proceeded to give me loads of yarn!  Here's to another hobby with yarn!  So excited!! Many of the items I wanted to knit I couldn't because they weren't knit... they were crocheted.  NO LONGER AN ISSUE! Yesss! Bring on the crafting season!

Since I had some time to kill I learned to crochet this week and did a granny square (in Philly Eagles colors, of course) and made a star.  Those videos were super helpful and great.

Rather proud of this... first try!

The star isn't as good... one point wasn't done correctly. Oh well! I'll make another soon... =)

Thoughts?

Sunday, August 11, 2013

I like my flowers like I like my coffee.... Covered in Bees!

This summer I didn't plant much in the backyard.  Maybe a few plants here and there, but I usually let the wilderness decide what survives (you hear what I'm saying? Instead of a green thumb, I have a black thumb and tend to kill my plants).

With that being said, I noticed that the morning glories from last summer were coming back... and with the rain, they were coming back strong.  This morning, especially, the flowers were in full bloom and looked lovely.  And then we noticed them moving! And they some very, very happy bees rolling in the pollen.

Here are the best shots from the morning...

Pretty flowers - so vibrant!

I don't have photoshop... otherwise I'd darker parts of this one.

Same with this one.

BEES!

Such happy little guys.

 Love this one.  Pollen covered butt sticking out. So cute.

He stumbled out of the flower, like a drunk from a bar. Definitely my favorite.

Although, this one is pretty cool.

That's not a bee! =) Silly Domino.

Thoughts?

Tuesday, July 30, 2013

One blindingly white mouse

Remember how I learned to knit for a mouse pattern? Well... it dawned on me the other day that I knew everything I needed to know to make the pattern!

Because I'm stubborn I made some changes.  I wanted to make six of them in Christmas colors to make them Jingle mice (and even put bells in them).  So I needed to learn how to stitch in a pattern... or, the easier way, just stitch in the letters.  Once again, YouTube gave me two different videos - one doesn't have audio and the other is out of focus.  Siiiiigh.

However, these things take too long to make six of them.  Also, I'm not a fan of how large they are.  Maybe these will be ornaments with family member's first intials on them?

Side view.  Very stiff little guy.


This shows how large it is and the nice J I stitched on.
As always, Domino isn't impressed. Although, she does want to play with the yarn.

Thoughts?

UPDATE: I've decided to make them all to spell JINGLE. The 'i' came out fat because I was watching Netflix while knitting and got distracted. Whoops. 

Also, I switched the colors to make it more festive when I finish them all. 

UPDATE #2: I finally finished them all! See what it spells? =) I'm proud...

The 'e' isn't the best... but the others are pretty good lookin'!

Sunday, July 28, 2013

Coffee Cake Experiment

I made an awesome coffee cake from this blog last week.  I didn't use nuts because of potential food allergies, but it was really, really tasty.  We have a cooking/baking rule in our house: always make it true to the recipe the first time around.  It is very common for us to make a recipe exactly like it's written and then we modify it based on our palettes for the next time around (or, in the case of many recipes, we go "THIS ISN'T SALVAGEABLE" and throw the recipe out).

Something that I did right away with the original recipe was beating the egg whites into stiff peaks.  I waited until my mixer was busy last time and ended up nearing destroying my arm/shoulder doing it by hand.

 I really, really love my mixer.

With that being said, we thought the coffee cake recipe was missing something.  So, we decided to tweak it.  But how? The hubby and I had three different ideas on how to make it tastier.... thus.... A BAKE OFF!  First, we made the batter then split it into three batches to create each different version and make them into cup cake sizes for faster baking/easier to taste test, etc.


Three batters in three bowls... glad I have so many bowls.

The first batch I added vanilla extract because why not (my idea - curiosity).

The second batch we added two shots of espresso for a stronger coffee flavor (my idea).

The third batch we added the espresso grounds since they're finer than coffee but would still give that oh-so-coffeey taste (his idea).

We still put the brown sugar butter crumbs on top because they were delicious and didn't need tweaking.

I should have put more on some of them.  In the espresso ones, it sunk into the middle for a surprise when we bit into it. Pretty good.

However, I forgot that in the original recipe she warned about the batter rising and potentially dirtying the oven.  Sigh. The first batch were a little on the heavy side, so I just poured only half in for the second round.

The one in the back right hated me.

Also, notice how the vanilla ones were rising higher? I think it's because I put too much espresso in the other batter, thinning it too much. Ah well - this was an experiment anyhow. =)  The first batch were in the oven for 18 minutes before the vanilla ones finally weren't jiggling anymore (and the toothpick test worked as well).  However, the espresso ones weren't done baking so I had to pop them back in for another 5-7 minutes.  I think I could have put more brown sugar topping on them to help weigh the rising down as well.  As for the espresso grounds and remainder of espresso cakes, I found the same problem - the batter that was thinner with the espresso baked slower than the thicker batter with grounds.  Argh.

This is the espresso grounds one.  Very, very dark.  The hubby suggested removing the brown sugar on this one and icing it with dark chocolate.  I don't think he's wrong and will have to try it.

I'm not good at making pretty cupcakes. 

We decided to have them with a nice glass of whole milk.  Oh man, was that a good choice.


But how do they taste? Well, the vanilla ones are amazing.  The originaly recipe is delicious, so when adding in vanilla it's a win-win situation.  The second batch with the two shots of espresso in it are OK... but they aren't anything exciting.  Sort of bleah.  And the third batch with the espresso grounds are too strong, according to the hubster.  I think they're yummy... but I like strong espresso.  He's also got a good idea about icing them with chocolate.  Might be doing that for another day.  All in all, we found two good ways of altering the recipe and one eh way (meaning it won't happen again).


All my knit critters wanted to try some. =)  Suggestions welcome!