Showing posts with label birthday. Show all posts

Saturday, March 8, 2014

Choo-Choo Baby Blanket

Originally, for a friend's baby's 1st birthday I wanted to do a simple design using fleece I already had around the house.  Unfortunately, I didn't have enough fleece to do the simple project. D'oh!

Since I had a snow day and a stash of fabric, I started looking on Pinterest for an easy train themed baby quilt. SO MANY OPTIONS! I eventually settled on this one and started going through my fabric stash for boy friendly colors.

After an hour of mixing and matching, I settled on seven different fabrics to make the stripes at varying widths and train cars. I mimicked everything from that design mentioned above, but added a couple differences.

I love how this part came out. =) Pre-appliqué, of course.

I wanted his birthday on it so it'll stand the test of time (in theory, no clue how this will be received).  The other change was the engine needed little puffs of smoke... so cute!


Post appliqué - adorable!!


It's much larger than I thought it would be. Oh well. 

For the back I ended up getting new solid fleece for it since the light blue I had didn't match the front of the quilt. One of the ideas I used from Pinterest from another project was quilting down each seam of the stripes using a different pre-set stitch.  It turned out great since I used a mustard color for contrast.

The stitches are different on each seam.

Up close of one of the stitches.

Finished product! So cute!! I love how it turned out.

I'm rather pleased with the finished product.  Thoughts?

Wednesday, February 12, 2014

Cross Stitch Just Got Real

I have a lot of math inclined friends and family, so when I found this on Pinterest, I had to make it for their birthdays!  There wasn't a tutorial just an image, which made things harder.  I decided to show how I made this since there isn't one already.  Sidenote:  If you're into cross stitch and have a sense of humor, this website is for you. =)  They also have great tutorials and detailed "how to" images for cross stitch newbies such as myself.

If you don't know how to cross stitch, and I didn't prior to this project, I recommend watching several YouTube videos on the basics of cross stitch.  I like to think that all the yarn work and sewing I do has helped me get a better understanding on most stitching/yarn crafts.  But realistically, watching several videos was very helpful.

*Disclaimer: Realistically, I didn't make a pattern. I eyeballed an image of the original project on my monitor and wildly started stitching, hoping to be correct. Here's hoping you can navigate my "tutorial."

Materials I used
- 22 Count Aida Cloth from Michaels (15" x 18" - you'll have PLENTY left over - enough to make one or two more)
- Wood Hoop - 6"
- Embroidery thread and needle (I have a 45 Hand needle pack from Singer and used the needle with the largest eye to make life easier)

Once I put the cloth on the hoop, I trimmed it off to make life easier when messing with the thread.  After looking at images of trimmed cloth, I think I went too far. Oh well - the beauty of having a large piece allows me to make mistakes.  But then I remembered that my lovely hubby bought me an obscene amount of embroidery thread from an estate sale... and there was a smaller wooden loop inside!  I used the smaller loop to help me start the project to ensure it was centered.

The trick was starting the with bottom of the S and then ensuring that I kept along the same lines when making my stitches (no marking of the cloth necessary - but does require paying attention a lot).

It doesn't look like the font from the pattern.  But I'm OK with that.

I used the same color thread because why not? But if you're craving color, use whatever makes you happiest.  One of the main reasons the font doesn't match is because I didn't make the X that's traditional for cross stitch.  I just did \ marks and it looked really good! When I tried to do the X (note the minus symbol) it left spaces.  So I stuck with the diagonal stitch because it looked better.

I had fun with this one.  My t wasn't great, but the parentheses were... and they're harder.
The squared symbol isn't too great either... but this is still cute to me.

Once I finished the actual math equation, I put the original wooden hoop on it so I could add the explaination for the joke (so those of us not-so-math-inclined can giggle too!).

Not a fan of the crease in the cloth from using a smaller hoop. 

I used the website I mentioned earlier to figure out how to remove the crease... but it bugged me.

It looks like italics.

Instead of stitching "shit just got real" like in the original, I did "..." which I thought was funnier.

For the only part that required color, I asked the birthday boy specifically what color he loved.... and he said Cerulean.  Even in my big bag of thread, I didn't have that EXACT color, but I had something that was close enough to thr crayola crayon color he wanted. Then I decided to use a different border stitch, waves didn't make sense for him, but I thought this one was up his ally... and there were instructions.  Always a plus!

The border stich up close. The side is just zig zag, but the main border is the tutorial mentioned above.  However, I winged the corners (all by myself!). 

For the corners I started by making an L shape, then stitched twice at a 45 and once at 65 degree angle meeting at the corner of the L.

Domino, per usual, isn't impresesed.  Actually, quite jealous of me neglecting her for this.

And for the finishing touch was centering it in the frame.  This is when it would have been useful to leave extra cloth on the edges... and trimming it later. 

And initialing it would be smart. Oops.

All wrapped up and ready to go!

And then I made another one and actually did traditional cross stitch (X's for everything versus a slant /). I also measured and marked where the exact middle of the cloth then started with the h.  Parts definitely came out better, but I didn't want to do the same border.  Looking on Pinterest for a second time for cross stich borders yielded a better result  than the first time around (it also fueled by my new desiree to get better at this stuff).

Since this peron's favorite color is red, the thread I selected was a rich, dark red.  I then went for something simple... since the point of this isn't about the border, but is about the funniness that is this equation.  I used this as a rough guide, but I decided to only do the bottom. I counted 14 squares in from the wooden hoop on each side to make sure it was starting equally and marked the dead center for the fancy design.

I made the little design at the bottom... just went with it on the left then mimicked it on the right. No clue what I really did.

Thoughts? Comments? Suggestions?

Friday, November 8, 2013

Guthrie Wall Hanging

For my Dad's birthday I wanted to do something really cool.  I kept coming back to my maiden name and the family crest idea.  Then I came across this cool tutorial for awesome borders... plus I just figured out how to do applique properly with my Bouncing Baby Boy project and the awesome tutorial I used. ANNNND... paper piecing has gotten easier! Hooray skills coming together. =)

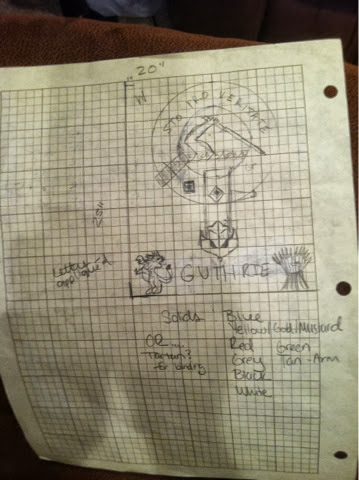
I had to sketch it out first to figure out the size and colors as well as where and what to put everything.

This was used as a rough outline in the end.

Letters that I had to trace on backwards... not fun in this font.

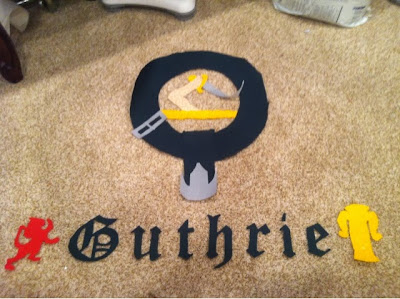
Once I started doing the cut outs of the letters, etc., to applique I realized the original orientation wouldn't work.  Lucky for me, one of the scrap fabrics from the discount bin was the PERFECT size!

I was rather proud at this point... but this is only 1/3 of the way done for the project.

Then I appliued everything on.  The 'G' and the Lion were really hard but I like how they came out.

His tongue looks so cool.  

The circle isn't so... Circular... but I like how it came out. I used red letters for the latin phrase "Sto Pro Veritate" which means I stand for truth. 


The three tartan colors are primarily green with lines of red and blue, so the red latin phrase is outlined in blue thread. Also, the letters that small were hard to embroider. 


I had fun with this one. 

Finally... the hard part... I tried actually quilting some fancy swirls on the corners.  It's hard to see here, because it's wet from be scrubbing off the blue ink, but I used this image from Google.  It's the one that looks like a corner.

This is my first time doing machine quilting. I'm rather proud of how easy it was and how well it came out all things considered.

This side looks a little better... not as wet.

I've used this pre-set border before but I really like it. Although, I should have used one less time/thread consuming...


Finished product. Can't wait to give it to him in a couple weeks!

Thoughts? Suggestions?

Thursday, June 13, 2013

Yellow-Bellied Chickens!

For some reason, two of my friends have chickens.  No real reason why they do, aside from the obvious ones that they're awesome and free eggs.  So for their birthdays (which were close-ish to each other) I decided to knit them chickens.  First, though, I made one for my Grandmother because she used to own chickens.  (Also, I know the chicken isn't yellow-bellied...)

I found what seemed to be an easy tutorial from Ravelry.com (lots of good patterns on there - free and for sale).  Now, I say that at the beginning of every attempt for all my projects... and then I usually find the hiccups as I go along.  I have a thing for finding patterns that push me to learn new things... regardless of how painful the learing process.  So, this one had two elements I didn't know - the mattress seam stitch and then I-cord legs.  Luckily, it came with instructions for those of us that didn't know what an I-cord leg stitch thing was.  The mattress seam stitch was easy to find on YouTube.

First off, the pictures on the tutorial don't make you realize just how TINY these things are.  I'm used to 6-7" for a small toy when completed - this was maybe 4".  I know, I know... had I read the tutorial fully it warned me of this fact... but reading it and seeing it are two different things.

See? It's about the size of a pear. Plus, I really need to cave and buy Fiber Fill. I'm using old packing materials.

Next were the wings.  I thought I could do it... but in reality, I didn't know what knitted cast on meant. Awesome... another thing about this pattern I didn't understand. Sigh. So, I did some research and found a great YouTube Video that helped me figure it out.  Rather proud! First try and both came out as pictured =)

The beak required me looking up this video to help learn the Knit Front to Back concept. I wasn't too bad at it... but I'll need to practice it more for the next two I'll be making.

The rest of it was rather easy to knit. I enjoyed it... even if it was tiny.  Can't wait to knit more!

Front view - adorable!

Side view - the wings came out nice.

Shake your tailfeather... which came out rather well.

Domino can't help but sniff it... looks too real.
She's not impressed. Sigh.

Thoughts? Suggestions? All welcome!

UPDATE: I made another one! Look at how cute he turned out... love the color combo =)