Showing posts with label quilting. Show all posts

Saturday, March 8, 2014

Choo-Choo Baby Blanket

Originally, for a friend's baby's 1st birthday I wanted to do a simple design using fleece I already had around the house.  Unfortunately, I didn't have enough fleece to do the simple project. D'oh!

Since I had a snow day and a stash of fabric, I started looking on Pinterest for an easy train themed baby quilt. SO MANY OPTIONS! I eventually settled on this one and started going through my fabric stash for boy friendly colors.

After an hour of mixing and matching, I settled on seven different fabrics to make the stripes at varying widths and train cars. I mimicked everything from that design mentioned above, but added a couple differences.

I love how this part came out. =) Pre-appliqué, of course.

I wanted his birthday on it so it'll stand the test of time (in theory, no clue how this will be received).  The other change was the engine needed little puffs of smoke... so cute!


Post appliqué - adorable!!


It's much larger than I thought it would be. Oh well. 

For the back I ended up getting new solid fleece for it since the light blue I had didn't match the front of the quilt. One of the ideas I used from Pinterest from another project was quilting down each seam of the stripes using a different pre-set stitch.  It turned out great since I used a mustard color for contrast.

The stitches are different on each seam.

Up close of one of the stitches.

Finished product! So cute!! I love how it turned out.

I'm rather pleased with the finished product.  Thoughts?

Friday, November 8, 2013

Guthrie Wall Hanging

For my Dad's birthday I wanted to do something really cool.  I kept coming back to my maiden name and the family crest idea.  Then I came across this cool tutorial for awesome borders... plus I just figured out how to do applique properly with my Bouncing Baby Boy project and the awesome tutorial I used. ANNNND... paper piecing has gotten easier! Hooray skills coming together. =)

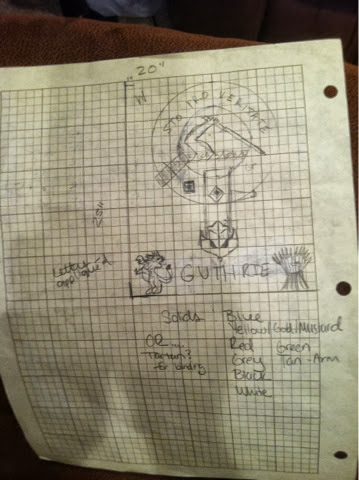
I had to sketch it out first to figure out the size and colors as well as where and what to put everything.

This was used as a rough outline in the end.

Letters that I had to trace on backwards... not fun in this font.

Once I started doing the cut outs of the letters, etc., to applique I realized the original orientation wouldn't work.  Lucky for me, one of the scrap fabrics from the discount bin was the PERFECT size!

I was rather proud at this point... but this is only 1/3 of the way done for the project.

Then I appliued everything on.  The 'G' and the Lion were really hard but I like how they came out.

His tongue looks so cool.  

The circle isn't so... Circular... but I like how it came out. I used red letters for the latin phrase "Sto Pro Veritate" which means I stand for truth. 


The three tartan colors are primarily green with lines of red and blue, so the red latin phrase is outlined in blue thread. Also, the letters that small were hard to embroider. 


I had fun with this one. 

Finally... the hard part... I tried actually quilting some fancy swirls on the corners.  It's hard to see here, because it's wet from be scrubbing off the blue ink, but I used this image from Google.  It's the one that looks like a corner.

This is my first time doing machine quilting. I'm rather proud of how easy it was and how well it came out all things considered.

This side looks a little better... not as wet.

I've used this pre-set border before but I really like it. Although, I should have used one less time/thread consuming...


Finished product. Can't wait to give it to him in a couple weeks!

Thoughts? Suggestions?

Sunday, October 20, 2013

Bouncing Baby Boy

Tis the season to have babies, tra la la, la la, la la la la....

But seriously, I'm at the stage of life where all my friends are either getting hitched, making babies, or both. Which is great for them! So to celebrate, I decided to make some baby blankets.

I didn't want to do anything too complex because, after some research, apparently baby blankets aren't but are typically cutesy and cuddly.  Hancock had a sale on fleece, which isn't unusual, so I got enough for four blankets, two of baby blue and two of baby pink.  

I wanted to use a new appliaque process that I saw on Pinterest with circles.  After stewing in my creative juices for a couple months, I used the circles and combined the common phrase "Bouncing baby boy" on the blankets.  

It took a while to make these things... mostly the layout of them as well as cutting all the letters and circles out.

So. Many. Circles. And the batting can be seen here... but not the actual letters which were hiding on another shelf.

See all those letters? Yeah, the original plan I had for ALL those letters I cut out didn't work. ARGGHH. Frustrated that I wasted so much time and materials I walked away from this project for about a month and a half. Eventually, after nursing my crafting pride back to health, I decided to use this tutorial on appliqué to finish at least one for a friend's baby shower.


However, I scrapped the original "bouncing baby" idea because I was running short on time and went for his name instead.  Ended up cutting off some of the white space too. 


Appliquéing all those circles and letters on there took forever.  It's not a small baby blanket... it'll fit the baby until it's a toddler. (Again, it's lying on our pool table... AKA the Quilted items presentation table).  And I used batting so it's super warm.


The Momma's theme was Monsters, Inc so the Monsters U fleece I found was PERFECT.  I also used extra to make it lap over as binding too. 

Of course, it calls for Steam a Seam, which both Joann and Hancock Fabrics didn't in store.  I could only find it online at Wal-Mart or on Amazon.  Annoying. I didn't want to wait! I wanted to do it ... NOW. Figure it out, NOW. Sigh.  I really hate waiting for things.  So instead I found something that does the same thing (and was just as easy and cost much less). 

But I didn't stop there. I also decided to knit some baby booties. 


This isn't the finished product, but they are rather cute. 


These are the finished product... ta-da!


I made two sets for two different little boys. Super easy to knit and it's a free pattern from Bernat... not selling those though. Just for friends!

Thoughts?

Sunday, May 12, 2013

Mother Day's

Happy Mother's Day to all you mommies (including you pet mommies)!

I had been knitting a lot lately so I wanted to sew a little for all the mommies in my life.  There was an adorable pattern I found on Pinterest that I had been eyeing and finally bought it off Etsy.  Totally worth it.  The best part? I didn't know anything about paper piecing and the woman who created the pattern had FREE videos on how to do paper piecing. Amazing, right? Super easy to follow as well.

My mom's gift was easy - horses.  Fawn and Jerry are the horses that I grew up with and they're still kicking (literally - they knocked Dad's dog Luca upside the head a couple months ago when he wouldn't leave them be).  

Here's Jerry, the one-eyed wonder.

Fawn's coat isn't looking too hot here, but you get a better view of Jerry's head poking out.

Since the pattern gave me two angle options, I made Jerry one way and Fawn another. Even though Jerry's a gelding, they're in love and it's adorable.  You can't put them in separate pastures or Jerry jumps over the fence to be with her.  So, I had to do two.

I'm finding that I'm not good with paper piecing and doing it the traditional way. I don't stitch to the paper... ever. I should practice but doing it the correct way, but for these pillows I cut out the big chunks and folded the paper and eyeballed the stitching. I bet all you real quilters are cringing at the thought of me doing it that way, but it worked.... sort of.

On Fawn's you can see that it didn't work out with the right eye and ear.  But the rest was pretty good.

The right eye/side is driving me nuts. But she's super cute.

On Jerry's I made a lot more cuts on the chunks before stitching them together to make sure it was even angles, etc.  It worked better.


Jerry only has one eye so it's supposed to look like this on him. But his is SO much batter!

Looking back on the horse pattern I should have added a tail. But ehhhh. I still LOVE this pattern. I might make another set for others.

Super cute. Love this pattern!

Mom in law was a bit different.  She doesn't have a specific animal that she goes "EEEEE" over (maybe cats... but not like me, obviously I'm the Queen of Crazy Cat Lady Town) but I wanted to have pillows for her that would make Dad in law happy too.  So I looked back at the sewing machine cover I made and made a pillow version of it.  The hubby seemed to think that would be the best option for them and their home.

On the left pillow I stitched Orion, minus his bow.  On the right are the dippers.

Big and Little Dipper.

Orion looks better here.

My Grandmother loves quilting items. All times.  She used to go to Lancaster, PA and buy the prettiest quilts and hang them on her wall, put them on all her beds, and give them to us.  I blame her for my original interest in quilts and mom in law for my love of attempting to make them.  When I was looking through the Etsy shop for the Peeping Horse, there was a Peeping Duck pattern. Sold - I knew she'd like them.

I made four ducks total.  One was a practice set and I took them for our couch and the better ones I gave to her.  I did the first one as the male mallard, but I wanted the second one to be different.  After Googling a couple pictures, I finally decided that I could use a cheetah type fabric to mimic the feather pattern of the female mallard.

This is my practice duck. The nostril is killing me. She's hooked on quack. =D

I love how the female mallard is taller than the male.  These were the better two. Sigh. Need to practice more with paper piecing!

Thoughts? Hope your Mother's Day is a great one!

Sunday, April 28, 2013

Ya ain't nothing but Houndstooth...

Since I've gotten Nina, I've been drooling over different projects on Pinterest that I could do.  Watching YouTube and Craftsy videos didn't help my desire (but will help with my technique and final products eventually).  I've decided that I'm going to make a throw quilt a month (or try to) to either give away to friends or to sell on Etsy (given the pattern I use allows me too).

Anyhow, one of my friend's bought their second home (check out her blog about it!) so I wanted to make them something to celebrate.  My friend is rather modern in her decor and I tend to mock her for it as I prefer comfort.  However, when I found a free Houndstooth pattern online I knew I found something that I could make her and she would like. It was rather easy pattern to follow.

My one complaint is that when cutting the 21 2.5" stripes into triangles, the pattern recommended making my own 6.25" triangle pattern to make my life easier when cutting.  In theory, that worked on some of the stripes.  I recognize that it was probably due to my own undercutting (I prefer to have too much fabric rather than the exact amount) that created my issues but I was able to fix it.


As is the blanket is as big as my pool table. If I had added the other rows it would be bigger.


Also, I didn't make it as big as it claimed it should be (otherwise it would be a HUGE throw).  But I noticed that the template had me making an excess of squares... even with the correct dimensions   So I have a bunch left over.  Maybe I'll make matching pillows eventually... who knows.

As for the colors, my friend has two dogs, two cats, and I forget how many chickens.  I didn't think white fabric was the best choice for her house.  I went with black and a medium grey as they're more forgiving with pet hair/stains.  The grey fabric has a design on it because I can't will myself to buy solids. I know solids are a quilter's friend but... arrrggh sooooo boring.

Love the orange stripe with paw prints.

The fleece on the back is a darker grey than the front color and the stripe of orange with paw prints gives it a little flare that I think looks rather nice.  I know her tastes in favorite colors changes regularly, so I was going for a blanket that would stand the test of time (or at least match a season!). Originally, I was going to use an  orange binding to tie in the stripe.... but I remembered her mentioning something about neon colors/zebra print and decided to use pre-cut strips from a jelly roll the mom in law sent me. It made it so much easier.

I used a fancy stitch on the binding to help prevent it from ripping apart too easily. Still a real possibility though.

I used four different zebra/cheetah prints.  I think it adds a nice BOOOM to it.  Quilting it might have been too much with the houndstooth pattern.

Also, I didn't do any quilting on it.  I had found a couple tutorials on how to add straight diagonal lines on this pattern, but it just seemed too busy for me (I would have used black or white thread).  So I opted to not stitch it together and to use a fancy stitch on the binding for strength.  I purposely used a different thread color to stand out.

Klaus approves.

Thoughts?

Tuesday, March 19, 2013

When I dip, you dip, we dip.

I've been working on Nina a lot lately, so Pinta has been glaring at me in judgement the whole time.  Since she's older and needs more love, I decided to make a cover for her (something I've been meaning to do but kept forgetting) to keep the dust out.

Remember those KitchenAid Covers I made? Well, I used the same principle for it but I didn't want to make it the same boring one fabric.  I wanted to make it similar to this, but not exactly the same. So it inspired me to do a quilted block for the cover.  But I did use maxi piping again (I kind of fell in love with that stuff).

I found a really cool bear tracks block on Pinterest and modified it so it was tracks walking up and over my machine.  I added a solid stripe next to it so it would be a bear walking under the night sky.


I only did four but looking at it now I could have done six or eight and it would have looked better. Oh well.

Originally, I was going to use this as an excuse to work on my machine quilting skills with Nina, but I opted to be SUPER nerdy.  Can you tell what I did? No? Well... maybe you tell what they are from looking at the side piece of the cover ....

The dork inside me is giddy. (It's Orion the Hunter).

I started in the middle and pinned the heck out of it with the piping in between the two pieces.  Seriously, the more pins the better for this.

See the Big Dipper? I know, there's about an inch gap from the bottom.  I'm OK with that, but I'll have to add an inch next time.

You can see the Little Dipper now (that thread is from the piece of fabric place holder, not my cover).  Get why the tracks had to be bears? The original constellations (Ursa Major and Ursa Minor) are shown as bears, not cups or anything dipper-related.

Orion didn't come out as well he should have. My mistake when sewing them together.

Technically, this is reversible but I really made this side pop so... no need to see the other side. =) Happy sewing!

OK.... fine! Here's the other side. But there are no fancy stitches or piping, just plain crazy cat lady fabric....


Feedback welcome!

Tuesday, December 25, 2012

It's Beginning to Look a Lot Like...

FINALLY... I can share with you my Christmas creations (now that I've given them all away to people).

Everyone Got this one

I made an army of wine cork reindeer.
(Notice the newspaper that I used? It's clippings from the Battle of Antietam... reindeers attack!)

I used the following tutorial to make them.  The whole post gives you a ton of ideas of what to do with your spare wine corks.  I just think the reindeer were so cute.  Mine are a little different (the picture isn't very good, sorry).  I used brown pipe cleaners to make their rack more impressive.  Also, the bulb for a nose wasn't doing it for me so I used red jingle bells.  I added a string of green sequins so they could be hung on the tree or just to look like their reins.  I had WAY too much fun making these.

The Men's Gifts

Domino poses with Dad's Phillies wreath and Mike's Orioles wreath.

I bought 40 baseballs off Craigslist for about $30.  The seller was super nice and a huge baseball enthusts.  I'm pretty sure he wouldn't have sold me the balls if I hadn't said I was making wreaths for huge baseball fans (he required that I send finished product pictures. Nice guy!).  So I used this blog post as a guide on how to do it. I didn't use softballs because I had so many baseballs it wasn't necessary.  However, the coat hanger... ehhh not that great. These all kind of sag when on the door.  Makes me sad. I would use two coat hangers the next time or loops of metal wire... something more sturdy.


Now, the Braves one for Jason's Dad was a different story.  All the letters I got were from Michael's and I had to paint them the correct team colors.  However, I wanted a little tomahawk to make it look exactly like the Atlanta Braves logo.  Do you know how hard it is to find a pre-made one?! I ended up using scraps from Home Depot (they're really cool about it - just ask the guys at the back by the cutting station if you can have anything left on the floor).  I glued it together using wood glue, painted it red, wrapped yellow ribbon around it and glued it to the back of the A. It looks pretty cool.

The Mother-In-Law's Gift

She got me heavily into sewing so I wanted to make her something special.  She, and most of my husband's family, is a big fan of reading. When I found this bag pattern I nearly cried from joy.  However, I hate paying for patterns. I think everything should be free. So I ended up using this free wall hanging pattern as a starting point for the book leaning side of the bag. As you can see below, it came out very nicely.  The fun part was using scrap fabric for the books or fabric that she had given me to "play" with earlier in the year.


The pockets were the hardest part for me. I knew how to make a bag from an Easy Quilt's free tutorial on laptop bag making that I had done for my mom last year, but it didn't have pockets.  I used batting in between the library book theme fabric, which I don't recommend because it got way too thick and my old Singer couldn't handle it (I broke a needle at one point... whoops).  Also, the fabric I used for the interior was from a fabric website that I LOVE. 

The Knitting Obsession Begins...

So I found a cute pattern on Pinterest, which links to Ravelry.com a knitting/crocheting website, but I had no clue how to knit or even how to read the stupid pattern. Determined to figure it out, I decided to teach myself with YouTube videos how to knit a scarf, which everyone claims is the easiest place to start.

The Mistake...

Yeah. Easy. This stupid swatch shows you how "easy" it was for me at first. That took me about 3 hours of cursing, hissy fits, and wanting to chuck the needles out the window.   Eventually, I calmed myself down and tried again. I got it right, but to knit a scarf in garter stitch took me forever it felt like.  But I now know what I did wrong in the beginning. I was picking up stitches from the row before and increasing every, single row by 2-3 stitches. At least. So, when you're teaching yourself to knit, take your time to see where the needle is going or you're going to be VERY frustrated... very fast. 

Bailey liked to help me along the way (shocking).

See? I eventually got it right.  I finished this one and started on another one pretty much the next day.  

Same stitch, same needle gauge (US8), and same exact boring style.

Ladies!
Now, for some stupid reason, I didn't take a picture of what I made for all my female friends (arrrrrgh, bad Laura).  I made each of them a rice heating pad. I feel that at my old age *cough* all my friends are finding they have random aches and pains. So, I asked for their favorite scents, bought a bundle flannel fabric from Hobby Lobby and essential oils from Amazon, and sewed away! The tutorial I used wanted me to break it down into sections, but I ended up making three long tubes (instead of just a sack of rice that would bunch up and annoy my friends).  I used ziploc bags for different scents, dosed it all, and shook away! Now, some scents faded faster than others I recommend "touching up" the scents before giving them to others to ensure they still smell nice. The smell of burnt rice is vile.

Well... those were my Christmas gifts! Yes, I had to plan in advance, but it was well worth it to see the look on my friends and family's faces when they opened them. Merry Christmas!